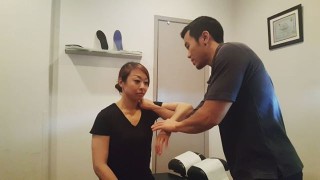
This is the Hawkin&;s kennedy test – it&;s an orthopaedic test designed to be coupled with a few other tests in order to test for subacromial impingement – often coupled with the painful arc and an infraspinatus test.To try this – keep the upper arm parallel to the floor, and rotate the forearm inwards towards the ground, you can do this at various angles as you move the arm across the body.Either try this yourself or have someone try this on you. If it hurts you may have some sub-acromial impingement! Ask yourself: Do I do a lot of repetitive overhead movements?Does it hurt when I throw right in the front point of the shoulder?Do I avoid certain movements because it hurts or feels awkward?Do I favor one side over the other because of this?Book an assessment with a professional as there are plenty of factors that can contribute to this. To name a few: Weak rotator cuff musclesTight rotator cuff musclesImproper glenohumeral rhythmPoor movement patternsThoracic spine limitationsSICK scapula posted on September 25, 2017 by Dr. Jonathan Leung | No comments by
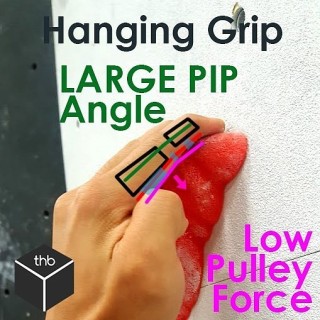
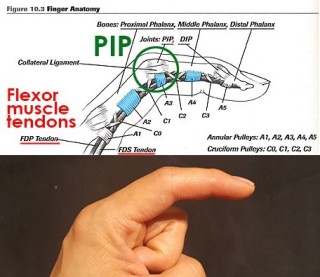
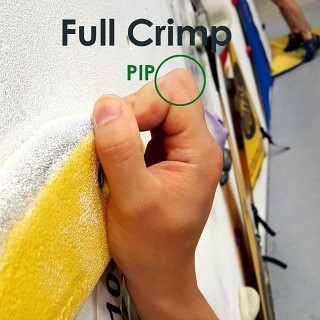
[Finger anatomy series 3/3] 3.The Proximal Interphalangeal joint or PIPNow that you know about the flexor tendons, the function of the pulleys and where they tend to pull, you should be able to guess why the PIP joint is so important!The PIP is the main joint that dictates the forces along the pulleys due to the position and angle of pull from the forces of the tendons.Demonstrated here is more of a hanging grip or an open handed grip. The angle of the PIP in this image is quite large and thus the resultant forces on the pulleys is minimal !! The SMALLER angle in the PIP = GREATER forces on the pulleys! Take this into consideration when thinking about how you grip your holds! I&;ll demonstrate with some more pictures in the following posts! posted on August 22, 2017 by Dr. Jonathan Leung | No comments by
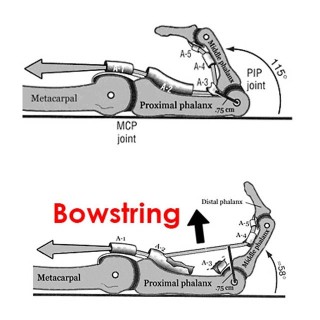
[Finger anatomy series 2/3] 2. Annular Pulleys These puppies prevent your finger from doing something known as bowstringing. These pulleys are fibrous bands that are used to maintain the contact of the finger tendon along the bone. What they do is transmit the force of the tendon into different angles of pull. Without them our hands wouldn&;t function very well and would look very weird. Bowstringing occurs when there has been a COMPLETE pulley rupture. With climbing the A2, A4 and A3 are most commonly injured!A2 is the largest of them all and attaches directly to bone. This one takes the brunt of the work when we go to climb or crimp!A3 attaches to whats known as the volar plate – it doesn&;t really attach directly to the bone! This is super super important when ADOLESCENTS or younger adults are climbing as an injury here can PERMANENTLY affect a GROWTH PLATE! It can potentially cause dramatic issues for their future. A rule of is if an adolescent complains of finger injury – SEEK PROFESSIONAL HELP. A4 attaches to the bone directly as well closer to the finger tip and is much smaller than the A2. How can you use this to help? Put less strain on your pulleys! Warm up with progressive bodyweight when crimping. Slow and steady wins the race. Feel free and content with any questions or concerns but up next is the PIP and how to crimp safer and stronger! posted on August 18, 2017 by Dr. Jonathan Leung | No comments by
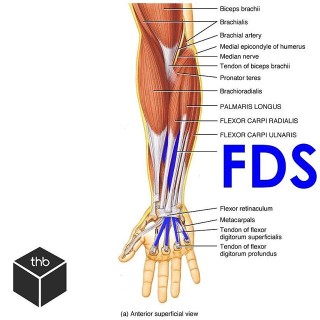
1. Flexor tendonsThe flexor tendons in the fingers occur because the muscles of the forearms become tendons as they enter the carpel tunnel into the hand.As you can see from the first image we have a bunch of other muscles of the forearm that affect motion of the hand and wrist. Well ignore those for now! First up is the Flexor digitorum superficialis or FDS. Swipe ️ and see it visualized again with its interaction with its deeper counterpart. The Flexor digitorum profundus or FDP is the deeper muscle that extends to the finger tip and helps us with flexing the entire fingerFDS is a tendon that splits into a V to allow the deeper FDP to run between it right to the tip! It inserts into the middle phalanx and flexes primarily the PIP joint. The design of these two tendons contribute to why we have such fine motor control at our fingers but it&;d be a shame if these tendons didn&;t have anything strong to hold them down! Next up. Pulleys. posted on August 17, 2017 by Dr. Jonathan Leung | No comments by
The finger is comprised of a number of joints, muscles, tendons, and many pulleys!Visualized here is your index finger! In the next posts we will will focus on 3 things: Flexor tendonsAnnular pulleysProximal Interphalangeal joint (PIP)There are many other components to the finger that are important to climbing. Injuries to these areas such as the joint capsules of each phalanx, each knuckle (capsule tissue injuries/capsulitis), the lumbrical muscles (another finger muscle injury source!) and the volar plates. (super super important for ADOLESCENT climbers! Attn: coaches) stay tuned. posted on August 17, 2017 by Dr. Jonathan Leung | No comments by
Swipe ️ to see all the climbing grip types. Climbers use their hands in a multitude of ways. This series of will demonstrate the various positions of climbing and grip types.Back to basics. Different hold positions.full crimphalf crimpopen crimppocketnarrow pinchfat pinchopen handPay attention to the positions of each grip and think about the angles between the MIDDLE knuckle in each hold type. This joint is the Proximal Interphalangeal joint or the PIP for short. Notice how the finger position in the pocket is very similar to a half crimp position? Sometimes even the open crimp/open hand position! Only on fewer fingers. The pinch grips are the SAME as the open grip position! Some of you advanced or pro climbers say Dr. Jon! That ain&;t all of them!… Well then here&;s a more exhaustive list but they all use the same concepts as above! What about slopers?Slopers use an open hand grip type to ensure maximum surface area contact for a friction based gripWhat about underclings? a jug hold with open hand/ half crimp grip stylesWhat of a Gaston? This along with the mantle is more of a pushing grip instead of pulling. Gaston is often in a half grip positionMantle is a open hand max surface area friction moveThe absolute best grip in terms of climbing longevity and strain on the fingers hand and pulleys is the OPEN HAND grip type. Remember this. Think about why it may be the case! My next post will showcase some of the anatomy of the finger focusing mainly on the pulleys! Stay tuned. posted on August 16, 2017 by Dr. Jonathan Leung | No comments by
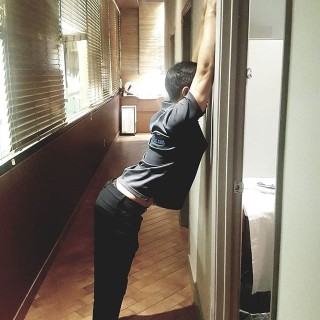
A to improving your climbing is to work on your weaknesses. These movements target two of my greatest weaknesses: . thoracic spine extensionshoulder extensionHere are 2 great openers I&;ve been working on:The first one targets more thoracic extension as I limit the motion into my shoulders by bringing them in closer to the wall. Simply stick your butt out further as you sink your body down and take 5 diaphragmatic breaths and bring your chest / face towards the wall. You can target specific vertebra segments depending on how far you stick your butt outSwipe ️ for a modification for targeting more of the shoulders and through the lats. This time try and bring your chest down at a 45 degree angle towards the ground in front of you. . Try these as part of your mobility work before climbing, handstanding or before calisthenics! posted on July 15, 2017 by Dr. Jonathan Leung | No comments by
&;Creamsicle toss&; this covered in the chalk and blood of my brothers before me.Beta tip:If you don&;t have the accuracy or desire to throw to a pocket/crimp (that you cant see because the red hides it!) use momentum and power to skip right past it. The next hold is a jug. I&;d rather throw an extra 4 inches than smash my hand a hundred times.Maximum effort climb but as fun as it gets!Thanks for the support and angles @heyyitscheryl Chris! Leen! Rudy! ction posted on April 29, 2017 by Dr. Jonathan Leung | No comments by
Just registered for the first Canadian climbing medicine symposium later this summer. Get ready climbers. posted on April 28, 2017 by Dr. Jonathan Leung | No comments by
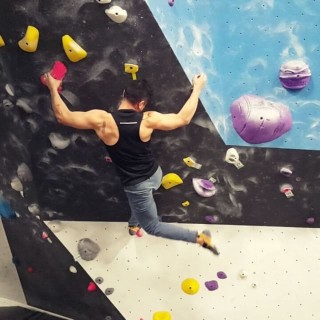
&;Big. Pink. Throws.&; another under the belt on my mission to v7! Climbing post intermission. Although it may not look like much I could not do this problem without the foot placements that I used here. Every little extra ounce of upward pressure or counter rotation gave me what I needed to send this puppy… And cuz @nawkn and bae was watching. ing_is_my_passion ing posted on April 8, 2017 by Dr. Jonathan Leung | No comments by